


Building page transitions with react-router v6 and framer motion
Setting up the basic building blocks to customize the UX


The goal
Based on an application with a proper layout, we want to have a simple and clean fade transition when navigating between the pages. Having a client-side rendered application and not implementing that would be a bit of wasted potential.
We will be using framer motion to handle the animations upon navigating. It's quite powerful for building sophisticated animations, so just using it for a fade transition between pages is a bit of an overkill. It provides the toolset to build much more elaborate animations.
An alternative for handling the exit animation is react transition group, which has a smaller footprint and leaves the CSS for the animation for entering/leaving up to you.
The baseline
Let's assume we have already an existing, simple client-side rendered react app that uses the createBrowserRouter function together with the RouterProvider component. Also, the code base uses a layout route with an AppLayout component.
A simple setup of a RouterProvider with the routes also using the AppLayout to layout the application. The components mapped here in the children section of the routes are the effective contentful pages of the application.
const routes: RouteObject[] = [
{
path: '/',
element: <AppLayout />,
children: [
{ element: <Navigate to="home" replace /> },
{ path: 'home', element: <Home /> },
{ path: 'training', element: <Training /> },
{ path: 'information', element: <Information /> },
{ path: '', element: <DefaultPage /> },
{ path: '*', element: <UnavailableErrorPage /> },
],
},
];

const router = createBrowserRouter(routes);

export const AppRoutes: React.FC<PropsWithChildren<unknown>> = () => {
return <RouterProvider router={router} />;
};
The AppLayout component is very simple. Important here is that we use the
Outlet to render the matched children routes within the application's layout
export const AppLayout = () => {
return (
<div>
<AppHeader />
<main>
<Outlet />
</main>
<AppNavigation />
</div>
);
};
The App component uses the App Routes and in this simple setup, nothing else.
export const App = () => {
return <AppRoutes />;
};
Adding framer motion to the solution
First, we need to add framer motion - it manages the transitions when mounting and unmounting react components as well as provides a great API to write animations.
npm i framer-motion
Setting up the framer motion and transition
Adding the AnimatePresence component of framer motion will handle the lifecycle of child components in the react tree. It will call the child motion element's animate / exit transitions when the component is mounted / unmounted.
Next, we need a motion.div element that will provide the animation configuration, where we will just go for a simple opacity transition with a duration of 0.5 seconds. Within the motion.div we will yet again have the router Outlet.
export const AppLayout = () => {
return (
<div>
<AppHeader />
<main className="relative">
<AnimatePresence>
<motion.div
className="absolute top-0"
initial={{ opacity: 0 }}
animate={{ opacity: 1 }}
exit={{ opacity: 0 }}
transition={{ duration: 0.5 }}
>
<Outlet />
</motion.div>
</AnimatePresence>
</main>
<AppNavigation />
</div>
);
};
As the entering page and the leaving page should be rendered during the transition at the same position in the browser, adding (Tailwind CSS)[tailwindcss.com/] classes will ensure that the new page will be rendered at the same spot as the old one (the new one on top of the old one).
When testing this snippet, we notice that only the first page load is animated. All subsequent navigations happen immediately without visible animations.
Components not properly mounted/unmounted
Let's go about fixing that: First of all, we need to ensure that all page transitions will have a new motion.div instance (so AnimatePresence can handle the exit/enter of them). That can be achieved by using the current location as an indicator of when to re-create it and apply as the (key)[react.dev/reference/react/useState#resettin.. to the component.
const location = useLocation();

<motion.div
...
key={location.pathname}
>
Now having that in place, it will re-create the motion component whenever the path changes (careful: Nested routing might need refinement). To test that this already works, you can render within the motion.div the current location pathname.
<span>{location.pathname}<span>
But the actual page is still not animated with the transition - why is that? Inspecting the rendered component in the dev tools of your browser will give you a clue: The Outlet component updates its content immediately whenever the route changes. What we built so far will result in temporarily rendering two motion.div elements with their content upon page navigation - the first div with a decreasing opacity, the second with an increasing opacity. But the Outlet component will update on both instances immediately, so the opacity transition animation won't have a visible effect, as both instances are on top of each other and have as opacity the sum of 1.
Changing the motion.div's props will make visible what happens:
initial={{ left: -2000 }}
animate={{ left: 0 }}
exit={{ left: -2000 }}
transition={{ duration: 3 }}
Now the old left-moving page immediately changes its content to the new page while still moving outside the viewport. To prevent that, we will need to stabilize the Outlet component.
Approach #1: Cloning the outlet and binding it with the path
We can access the outlet element through the (useOutlet hook)[reactrouter.com/en/main/hooks/use-outlet] and clone it within the motion.div. Here it's important to pass also the key property to the cloned element, so it will be re-created whenever the path changes.
const outlet = useOutlet();
{outlet && React.cloneElement(outlet, { key: location.pathname })} */}
Approach #2: Using a stable referenced Outlet
Wrapping the Outlet into a separate child Component StableOutlet allows us to put the initial outlet output into a local state and never update it, returning its value.
export const StableOutlet: React.FC = () => {
const o = useOutlet();
const [outlet] = useState(o);

return outlet;
};
Using that one inside the motion.div component instead of the Outlet will work now.
Having a closer look
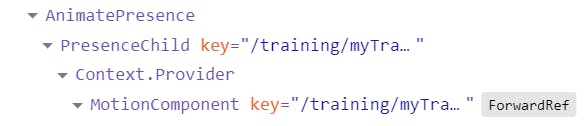
Using the (react-dev-tools)[react.dev/learn/react-developer-tools] helps us to get a closer look at what is happening under the hood: The AnimatePresence component wraps the children components in a PresenceChild component, which will handle the animation and removal of the component at the end of the animation:
If you increase the transition duration in the motion.div component, you can see both components rendered in parallel, where the first one is exiting and the second is entering:
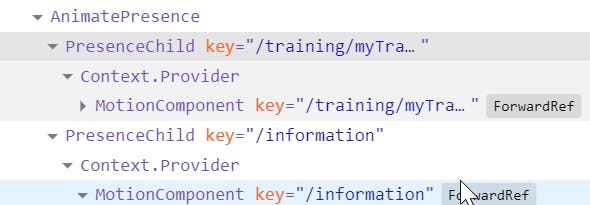
Once the exiting component has finished rendering, it will be removed from the react component tree and will be completely gone.
Wrap up
Handling page transitions has some pitfalls that need to be addressed to make them work as expected. But doing so is not rocket science and gives a great opportunity to have a closer look at how the different aspects of the react rendering mechanism, react-router and the framer motion play together to achieve what we want.
Having now the basics for the page transition in place, you can explore the full power of framer motion and go crazy building the most fancy page transition ever created by mankind!